|
|
|
Astral Imaging at Dogwood Ridge Observatory |
Latitude: 37°48'51.0" N" |
|
|
|
|
|
|
|||
 |
|
|
|
||
|
|
|
|
|||
|
(click on thumbnails to go to that image's page)
|
|||||
| ||||||||||||||||||||||||
|
|
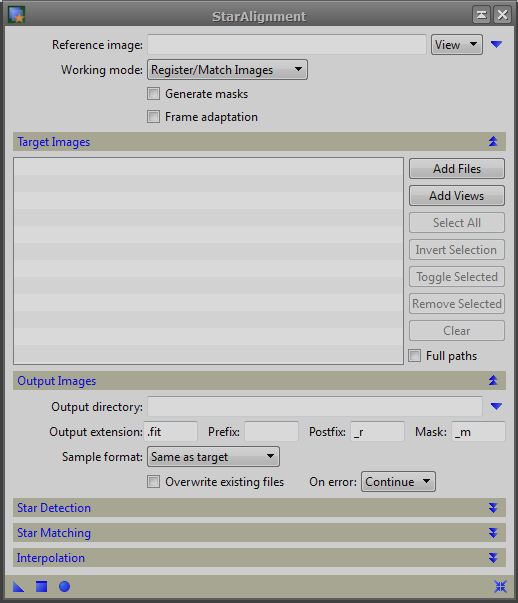
Pix Insight From the onset, I think you'll find that Pix Insight (PI) is a very different program. So much so that it may even discourage you from investigating thoroughly this very feature packed image processing software but that would be a mistake in my humble opinion. You can see for yourself by downloading the program and requesting a 45 day free trial. It has all the tools one could possibly need, less maybe bloom repair, with more, including bloom repair, on it's to do list. As of this writing there is no official written manual and for me, that's OK. Most wouldn't read much of it anyway. What is readily available are tutorials and videos demonstrating how to use certain functions of the software. One collection by Harry Page will cover the most basic tools in PI and get you well on your way. He also has a selection of advanced videos. Craig Stark of Stark Labs also has a few on his website. And then of course there are the official tutorials on PI's website found here. On this page you'll see on the right column that under resources are listed links for the video tutorials, processing examples, tutorials, and the image gallery. Blow that further down is a link to the PI user's forum which offers a great deal of assistance in answering your processing questions or general questions. You'll likely get answers from the PI Team members themselves as they monitor the forum. In short, there's plenty of help available even despite the lack of somewhat hard to understand manuals. I find manuals great for looking up specific questions but not so great for general reading. I also think that most will ask questions for assistance before reading or understanding a manual if there is an active and helpful forum available. I see this with many software specific forums now and those software have manuals. Enough about the lack of a manual. In a short period of time and a dozen or so downloaded video tutorials, I've managed to get a fairly basic routine down that rivals the other software I have used in the past. First and foremost, it is important to note that when any process is open, pausing the cursor over any option choice will result in a brief explanation of that box. Keep this in mind when given choices to choose. After the data has been calibrated using a master dark, master flat, and if needed, a master bias the calibrated data is saved to a new sub-folder named simply "Cal". This preserves the raw data. I have started to save the calibration master frames to this folder as well so that if sometime in the distant future I decide I want to reprocess the raw data, the corresponding master calibration frames are there. So far the data is calibrated and saved in a new sub folder. The next step is to align the calibrated frames. Now for me I usually don't bin the luminance data and bin the RGB 2x2. This means the luminance data needs to be aligned separately from the RGB. I open the "Star Alignment" process. This can be done in several ways. On the left column you'll find the "Process Explorer" tab. Clicking on that opens the tab and you'll first a selection opened under "Favorites". Below that will have the categories of the other processes. Under "Image Registration" you'll find two processes, "Star Alignment" and "Dynamic Alignment". Typically I use star alignment for aligning images with multiple stars that are the same bin rate. So I use star alignment and the process tool opens giving us a number of choices. The other way is at the top menu bar open "Process", open "All Processes", and pick "Star Alignment". Now to save memory, I use the "Add Files" tab under "Target Images" and navigate to my calibrated data sub-folder then choose all the files I need to align, in my case the luminance data first. I change the top "Reference Image to the image I want to register all the others to and make sure the selection box next to it says "File". If I used "View" the image would need to be opened and that also means the same if I had added images using "Add Views" instead of "Add Files". Like I said, it saves memory. Now that your reference image and all the images you want to register are set, make sure that the box below the "Reference Image" is set to the default "Register/Match Images". This tool is also used for mosaics but that's another topic.
Next, under "Output Images" you need to
tell PI where the registered images are to be saved. I usually name this
sub-folder PI under my raw data folder. At this point I'd have the raw data
folder and two sub-folders named Cal and PI. You also have several choices as to
how to treat and name the registered images so choose those at this time. I
usually leave the default settings and just navigate to the PI folder and choose
it. This leaves me with the registered images in the PI sub-folder with the post
fix of _r added to the original file name of each image. In most all of the
processes you have two to three choices to perform the process. The triangle
shape is for new instance of the process, the round circle is for global apply
and the box is apply. Some also have an icon that looks like a spinning top
which stands for real preview. The triangle is used by dragging it onto the
image you are working on to apply what changes you made. Conversely you can make
the adjustments and hit the square box icon and apply the settings. If you are
working on more than one image such as in image alignment you would use the
round circle icon for global apply for all images. In this case you would use
the global apply icon. If I have binned
RGB
data I'll repeat the process. Later, after the
RGB
and luminance images have been processed separately
I'll use the "Dynamic Alignment" process to align the two differently scaled
images to each other. At this point all your data should be aligned and saved
for further processing. See
Harry's video for more. Next we'll cover image integration, making the master
images. |
| |||||||||||||||||||||||||||||