|
|
|
Astral Imaging at Dogwood Ridge Observatory |
Latitude: 37°48'51.0" N" |
|
|
|
|
|
|
|||
 |
|
|
|
||
|
|
|
|
|||
|
(click on thumbnails to go to that image's page)
|
|||||
| ||||||||||||||||||||||||
|
|
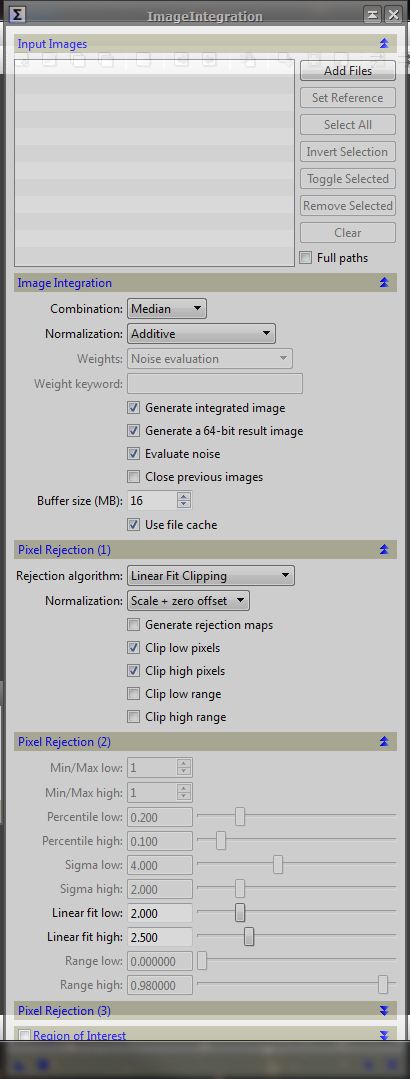
Pix Insight Now we'll cover image integration, making the master images. This process will be repeated for each different type of filter used for your images. In this case I'll do the luminance image first. Open the "Image Integration" process found using either the left "Process Explorer" tab and going down to "Image Integration" and opening that tool or using the "Process" , "All Processes" on the menu bar. Again you are given choices for how to combine your image data. You first add your data to be combined by clicking on the "Add Files" button and navigating to your aligned data folder and choosing all the images to be combined. In this case I'll pick my luminance images. They will be numbered and show in the dialog box. Next you choose if the data is to be Average, Median, Minimum, or Maximum combined. Average will result in a higher signal to noise ratio but I'll often use median if I have any satellite or plane trails in any of the images. Next you would choose your process for normalization of the images and how the data is weighed. I use Additive for normalization and noise evaluation, the defaults, for these choices but you can certainly experiment. Remember what I had said before about dialog box choices, "First and foremost, it is important to note that when any process is open, pausing the cursor over any option choice will result in a brief explanation of that box. Keep this in mind when given choices to choose." There are five options below that to choose as wanted. The next step is choosing a pixel rejection process. There are three pixel rejection sections. The first deals with the algorithm used while the second lets you adjust the parameters for each algorithm. I suggest using the default setting and see how they work and then adjust up/down as necessary. I have always left the third section alone. In most all of the processes you have two to three choices to perform the process. The triangle shape is for new instance of the process, the round circle is for global apply and the box is apply. Some also have an icon that looks like a spinning top which stands for real preview. The triangle is used by dragging it onto the image you are working on to apply what changes you made. Conversely you can make the adjustments and hit the square box icon and apply the settings. If you are working on more than one image such as in image alignment you would use the round circle icon for global apply for all images. Juan Conejero, a major Pix Insight
developer, gives this advice: "Average combination is always better in
terms of SNR improvement, even for three images, which is the smallest possible
set of images that can be integrated. For normal imaging purposes, there is no
reason to use median combination in PixInsight. Always use average combination
with the appropriate pixel rejection, and fine tune your rejection parameters. Experiment with the different combine methods as well as the algorithms and see which results are best for you. When it comes to combining data sets it helps a great deal if you dither your exposures to give a higher SNR to the final image. When you are happy with your result, save the image. I usually us a name that depicts what processes have been done in what order. For example, say this is M44 we've been working on, I'd name it NGC2359-11_avg. This tells me that the luminance master is made form a combination of 20 luminance images and averaged combined. Next up is cropping the combined image.
|
| |||||||||||||||||||||||||||||